Project: Cone Private Server Documentation [v0.55.14]

Translated with Google Translator
Serverless client
Project: cone is an app that uses a private server, and there is no officially provided service server. Currently, you can optionally use the development test server, but it is only a button to facilitate your development testing, so when the appropriate time comes, you must register and use someone’s private server or use it only locally.
And that someone’s private server could be yours :)
Download server file
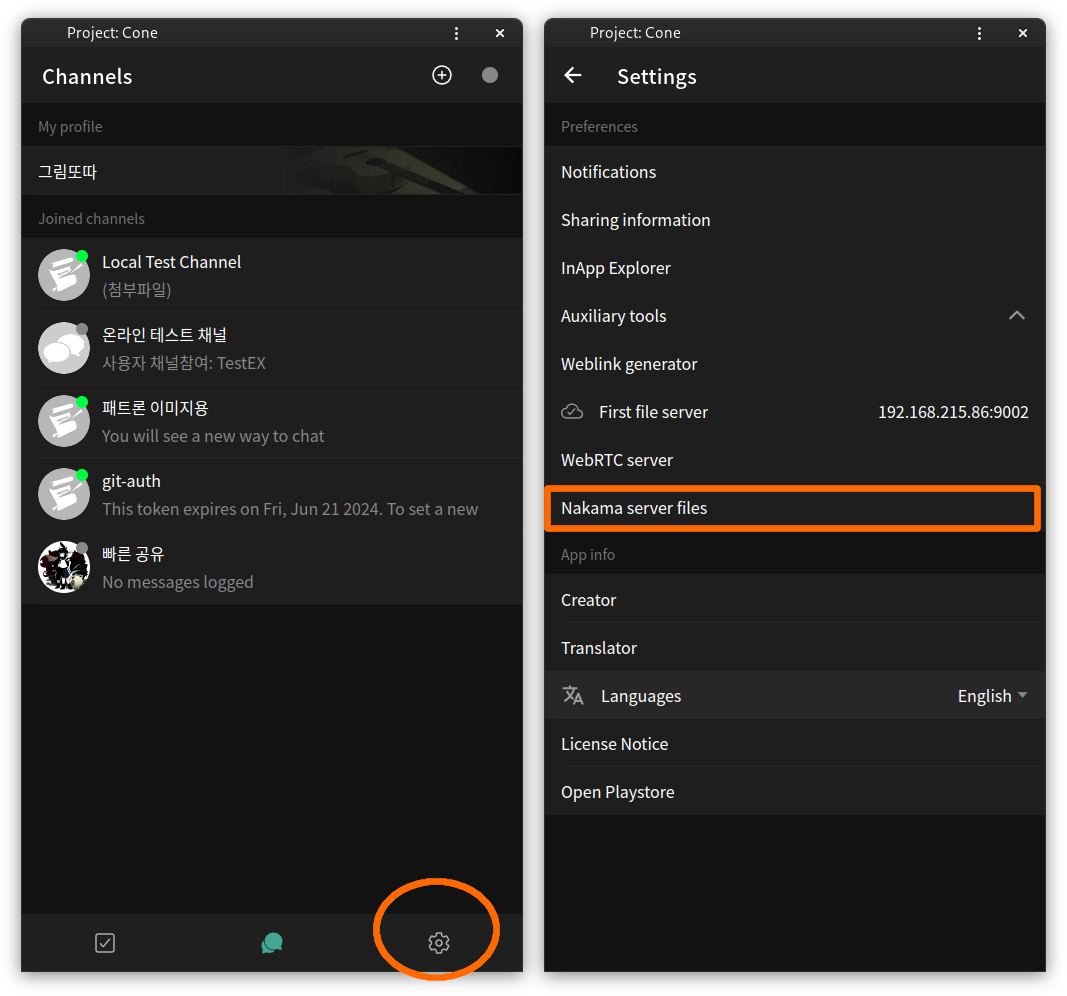
Server files can be obtained using the app settings > Nakama server file button or Git.
1
git clone https://github.com/is2you2/pjcone_server.git
If you receive it from a client, unzip it and you will see a folder structure that can be uploaded immediately with docker-compose. After completing the settings below, you can run Docker from this folder the next time you run the server.
Domain and SSL key issuance
The client is https-secured using a GitHub address. Since https does not communicate with http for security reasons, setting up SSL is essential if you plan to use a browser app.
Personally, I use a DDNS issued by noip and then a security key issued by certbot.
To speed up the process of obtaining a security key from certbot, create a new folder, create a docker-compose.yml text file, and write the following.
1
2
3
4
5
6
7
8
9
10
11
services:
  certbot:
    image: certbot/certbot
    container_name: certbot
    ports: # You can use the issued key even if you only use it for a short period of time.
      - "80:80"
      - "443:443"
    command: certonly --standalone --email [your@email.here] --agree-tos -d [your.domain.here]
    volumes:
      - ./certbot/letsencrypt:/etc/letsencrypt
      - ./certbot/logs:/var/log/letsencrypt
Once you receive the key pair (./ = based on the unzipped nakama folder or pjcone_server git repository folder)
- Public key is
./data/public.crt - Private key is
./data/private.key
Just move the file to.
If you already have a domain or security key, you can skip the issuance process.
Nakama / Postgresql
Did you know that the chat server you use is actually a game server? 😃
Nakama Server is an open source game server that allows you to configure your own server rules. The file we downloaded contains some code needed to perform client functions (./data/modules/*). If you add a new file to this folder and write code, you can add additional functions, such as hiding chat content containing profanity. You can also configure . Please refer to this page to learn more about server code configuration.
The overall settings of the Nakama client can be changed in ./data/pjcone.yml. For more settings, please refer to the Nakama Server Configuration page.
Later, when you run Docker, a folder called ./postgres/ is created, where what happens on the server is stored. If you want to reset the server, just delete this folder.
If the server is running normally, you can use the console at localhost:7351. The initial account is information written in ./data/pjcone.yml, and after logging in and creating a user, it is recommended to shorten the password to less than 8 characters to disable the administrator account.
Convert user to administrator
If you are granted administrator permissions in the app, an administrator tools menu will be added to the settings and you will have the following additional permissions:
- Assuming you have manager authority for all channels, you can grant quests to others regardless of the channel they participated in when creating the quest and whether they are the manager or not.
- You can use the administrator tool to send global notifications to all users registered on the server.
- Using the administrator tool, you can grant users manager privileges for each channel, attempt 1:1 conversations, and delete accounts.
- You can use the administrator tool to review group settings and members, and force the group to be disbanded.
To grant administrator privileges to a user, click Account > User in the Nakama console and add the value “is_admin”: true in the metadata field.
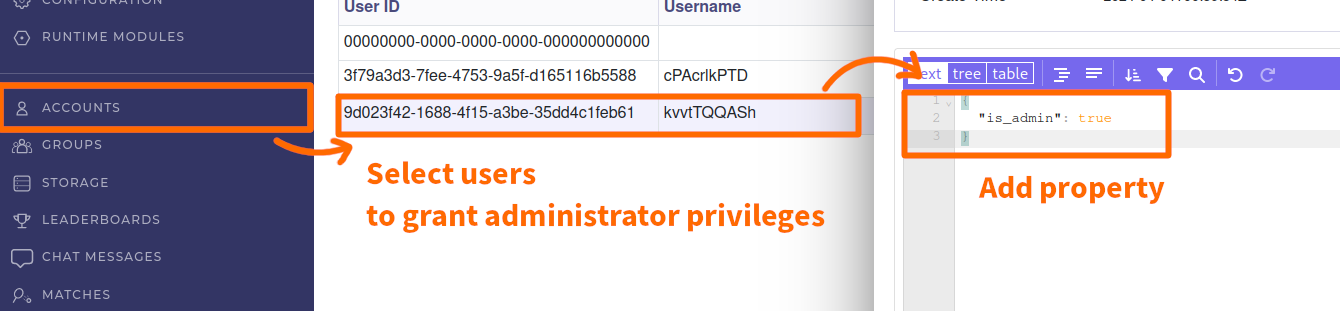
It will take effect when you reconnect after granting permission.
Apache / Express
Apache was added for file server configuration. Currently, we do not do account review in Postgresql, so when files are sent and received in the channel, those files will be publicly available online. Since Apache and Express cannot find an image configured at the same time, starting Apache Docker proceeds with nodejs installation and node package installation. For this part, we plan to create a separate Docker image in the future or extract the nodejs installation path to a volume and divide the actions depending on whether or not it is installed in a bash script.
The exchanged files are saved in ./uploader/cdn/*.
First File Server
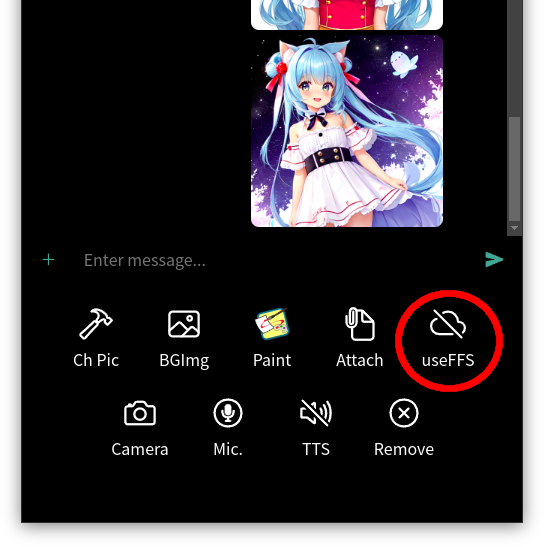
In Client Settings > Auxiliary Tools, there is an input box called First File Server. If you enter [Address: Port] information in this input box, it will attempt to upload the file to the entered server before uploading the file to the connected server, and if the upload is successful, the file will be shared to this server address.
The [Address: Port] you enter must be the open port of the web address of the server, and the upload port must be 9001. This way, you can manage the files you upload while still sharing them during chat. (Of course, in order for it to be shared properly, other people must be able to access the address)
Once this information has been entered, you can specify whether to use it or not before sending the file to the channel.
Coturn
Coturn is a WebRTC server that enables voice calls. The current version only allows voice calls in 1:1 conversations.
You can configure the server in the ./data/turnserver.conf file.
1
2
3
4
5
6
7
8
9
10
11
12
13
14
15
16
17
18
19
20
...
# You can change the port to use if you wish
# listening-port=3478
# listening-ip=175.210.64.135
external-ip=175.210.64.135
# tls-listening-port=5349

# Restricts the UDP ports to be used by WebRTC.
min-port=12021
max-port=13000
verbose
fingerprint
lt-cred-mech
# use-auth-secret
# static-auth-secret=
# realm=www.example.com # You must uncomment it and enter the domain address.
user=username:password # If you leave it like this, you can use voice calls right away without any additional settings after the server registers. If you change it, you must re-register the WebRTC server information in the app.
total-quota=100
bps-capacity=0
...
Please refer to this page for detailed settings.
About internal network chat
The Android app is configured as http and can use the internal network server.
To configure the internal network server, delete all settings related to SSL and change them to the pre-commented information.
Specifically:
1
2
3
4
5
6
7
8
9
10
11
12
13
# In the ./docker-compose.yml file
...
apache: # 파일 업로드 공개 서버
    container_name: apache
    image: httpd
    volumes:
      ...
    ports:
      - "9001:9001"
+     - "9002:80" # no-ssl
-     - "9002:443" # 컴퓨터:도커
    command: sh /usr/local/apache2/htdocs/setup_uploader.sh
...
1
2
3
4
5
6
7
8
9
10
11
12
13
14
15
16
17
18
19
20
21
22
23
24
25
26
27
28
29
// In the ./httpd.conf file
// You can find it quickly by searching for “ssl”
...

#LoadModule slotmem_shm_module modules/mod_slotmem_shm.so
#LoadModule slotmem_plain_module modules/mod_slotmem_plain.so
- LoadModule ssl_module modules/mod_ssl.so
#LoadModule optional_hook_export_module modules/mod_optional_hook_export.so
#LoadModule optional_hook_import_module modules/mod_optional_hook_import.so
#LoadModule optional_fn_import_module modules/mod_optional_fn_import.so

...

# Configure mod_proxy_html to understand HTML4/XHTML1
<IfModule proxy_html_module>
Include conf/extra/proxy-html.conf
</IfModule>

- # Secure (SSL/TLS) connections
- Include conf/extra/httpd-ssl.conf
- #
- # Note: The following must must be present to support
- #       starting without SSL on platforms with no /dev/random equivalent
- #       but a statically compiled-in mod_ssl.
- #
- <IfModule ssl_module>
- SSLRandomSeed startup builtin
- SSLRandomSeed connect builtin
- </IfModule>
1
2
3
4
5
6
7
8
9
10
11
12
13
14
15
// In the ./uploader/server.js file
...
- const options = {
-     key: fs.readFileSync('/usr/local/apache2/conf/private.key'),
-     cert: fs.readFileSync('/usr/local/apache2/conf/public.crt'),
- };
-
- https.createServer(options, app).listen(9001, "0.0.0.0", () => {
-     console.log("Working on port 9001");
- });

+ /** Run the server.*/
+ app.listen(9001, "0.0.0.0", function () {
+     console.log("Working on port 9001");
+ });
1
2
3
4
5
6
7
8
9
# In the ./data/turnserver.conf file
...
bps-capacity=0
stale-nonce=600
- cert=/etc/coturn/public.crt
- pkey=/etc/coturn/private.key
log-file=/var/log/coturn/turnserver.log
simple-log
...
1
2
3
4
5
6
7
# In the ./data/pjcone.yml file
...
socket:
-   ssl_certificate: '/nakama/data/public.crt'
-   ssl_private_key: '/nakama/data/private.key'
    server_key: 'defaultkey'
...